
How to Do Hot Foil Calligraphy on Ribbon
- Nov 21, 2019
- 4 min read
Updated: Apr 25, 2025
Tools I Love, Video Tutorial & Beginner Tips
Hot foiling has taken the creative world by storm — and it’s one of my favorite ways to add a luxurious, metallic touch to calligraphy. Whether you're decorating gift ribbons, personalizing event favors, or adding sparkle to your branding, hot foiling brings a next-level wow factor to your projects.
After getting tons of messages about how I foil on ribbon, I made a step-by-step video tutorial to walk you through the process! Scroll down for a full supply list, foiling tips, and info on how to learn more through my in-depth online course.
🎥 Watch the video tutorial here
Shop My Favorite Hot Foiling Supplies
If you’re ready to try it yourself, I’ve rounded up the exact supplies I use (and love). These are beginner-friendly and perfect for creating foiled calligraphy at home:
Everlace Design Co is a participant in the Amazon Services LLC Associates Program, an affiliate advertising program designed to provide a means for sites to earn advertising fees by advertising and linking to Amazon.com.
I may earn a small commission for my endorsement, recommendation, testimonial, and/or link to any products or services from Amazon.com. Your purchase helps support my work in bringing you real information about calligraphy supplies.
What you’ll need:
Heat foil pen
Heat-activated metallic foil (gold, rose gold, silver — all the pretties!)
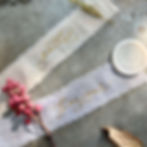
Satin or grosgrain ribbon
Magnetic mat from Foil Quill (a total game-changer)
Optional: tweezers, scrap paper, and test ribbon
💡 Pro tip: The magnetic mat keeps your foil in place without tape — no more foil clinging to your sweater sleeves!

Step-by-Step: How to Do Hot Foil Calligraphy on Ribbon
Even though the video is a great visual, here’s a quick written walkthrough to help guide you:
Cut your ribbon and lay it flat on your workspace.
Place your foil (shiny side up!) on top of the ribbon.
Secure everything using a magnetic mat or low-tack tape.
Heat your foil pen for 1–2 minutes.
Slowly write your design directly on the foil.
Let cool for a few seconds, then peel to reveal the magic ✨

Learn Freestyle Foiling in Depth: My Online Course
If you’re excited to take hot foiling beyond ribbon — onto cardstock, leather, vellum, wood, and more — I created a full Freestyle Foiling Online Course just for you.
This course is designed for creatives of all skill levels who want to explore foiling techniques on a variety of surfaces. I walk you through everything step by step, with real-time demos, troubleshooting tips, and traceable designs to get you started.
🧠 What You’ll Learn:
How to use a heat pen for hot foiling
Must-have supplies (and what to avoid!)
Setting up your workspace
Techniques for different materials: ribbon, paper, leather, wood, and more
Troubleshooting tricky surfaces

🎥 Video Modules Include:
Intro & Supply Breakdown
Foiling on Cardstock & Vellum
Foiling on Letterpress Paper
Foiling on Leather
Foiling on Cotton & Satin Ribbon
Foiling on Wood
📦 Included with Your Course:
Complete supply list with sourcing tips
Traceable designs for practice
Lifetime access with future updates
Private student group for sharing and support
24/7 access so you can learn on your schedule
“Get $30 OFF this detailed course on hot foil calligraphy — learn my exact process that helped my foiling videos go viral. Use code HOTFOIL30 at checkout for $30 OFF! Limited spots at this price!”
My Hot Foiling Journey (A Little Backstory)
I first got into hot foiling when a client asked me to personalize leather folios with something more permanent than paint markers. At the time, there were no heat pens available, so I improvised using a wood-burning tool and tested out all kinds of foils. (Spoiler alert: it wasn’t easy!)
Not long after that gig, the first foil heat pens hit the market and changed the game. I started sharing my foiling experiments on Instagram and Pinterest — and to my surprise, those videos became my most viewed content ever, with hundreds of thousands of views!
So many of you asked how to get started, which inspired me to create the course. Since then, I’ve foiled on dozens of surfaces and figured out the best tips, tools, and techniques, and I can’t wait to share it all with you in the course.

Common Questions About Hot Foiling
Can I use any ribbon for foiling?
Smooth surfaces like satin and grosgrain work best. Avoid heavily textured or stretchy ribbons.
Is this beginner-friendly?
Yes! My video tutorial and online course are designed to guide you even if you’ve never held a foil pen before.
Do I need a special printer or machine?
Nope — just a heat foil pen, heat-activated foil, and a creative spirit.

Let’s Stay Connected
Follow me on Instagram @everlacedesignco to see more foiling projects, calligraphy inspiration, and behind-the-scenes tips. And if you try this technique, tag me — I’d love to see what you create!
Thanks for stopping by — and happy foiling!
✨– Catherine